Thursday, September 4, 2014

I brought this one on myself: Cygnar vs. Skorne

Given that after a long night of college work I've finally gotten the time to toss this post together at the blissful hour of 7am, I hope that it turns out for the best. Sorry for the rough lack of posting or comments or any such things. I've been adjusting back to college, and getting settled into the Nova Nomads meta in Fairfax while trying to actually learn from my opponents beyond getting curbstomped.
Speaking of Curbstomp: eHaley. As my send off game in the league I was apart of in my home city of [REDACTED] I had decided to see how one of the worst casters to go up against, reputably, one of the most nonsense control casters just to see what happens.

To make things simple, I did well. Better than I expected. I nearly won. If I had thought to boost a damage roll, this would be a hilarious success story against impossible odds. Sort of like the every sports film but backed by a team of task masters, wearing a lack of compassion with pride. Fully overworking and marginalizing their center pieces while expecting no dissent and fantastic consistent performance. Huh... so like the dark truths behind every actual professional sports career.

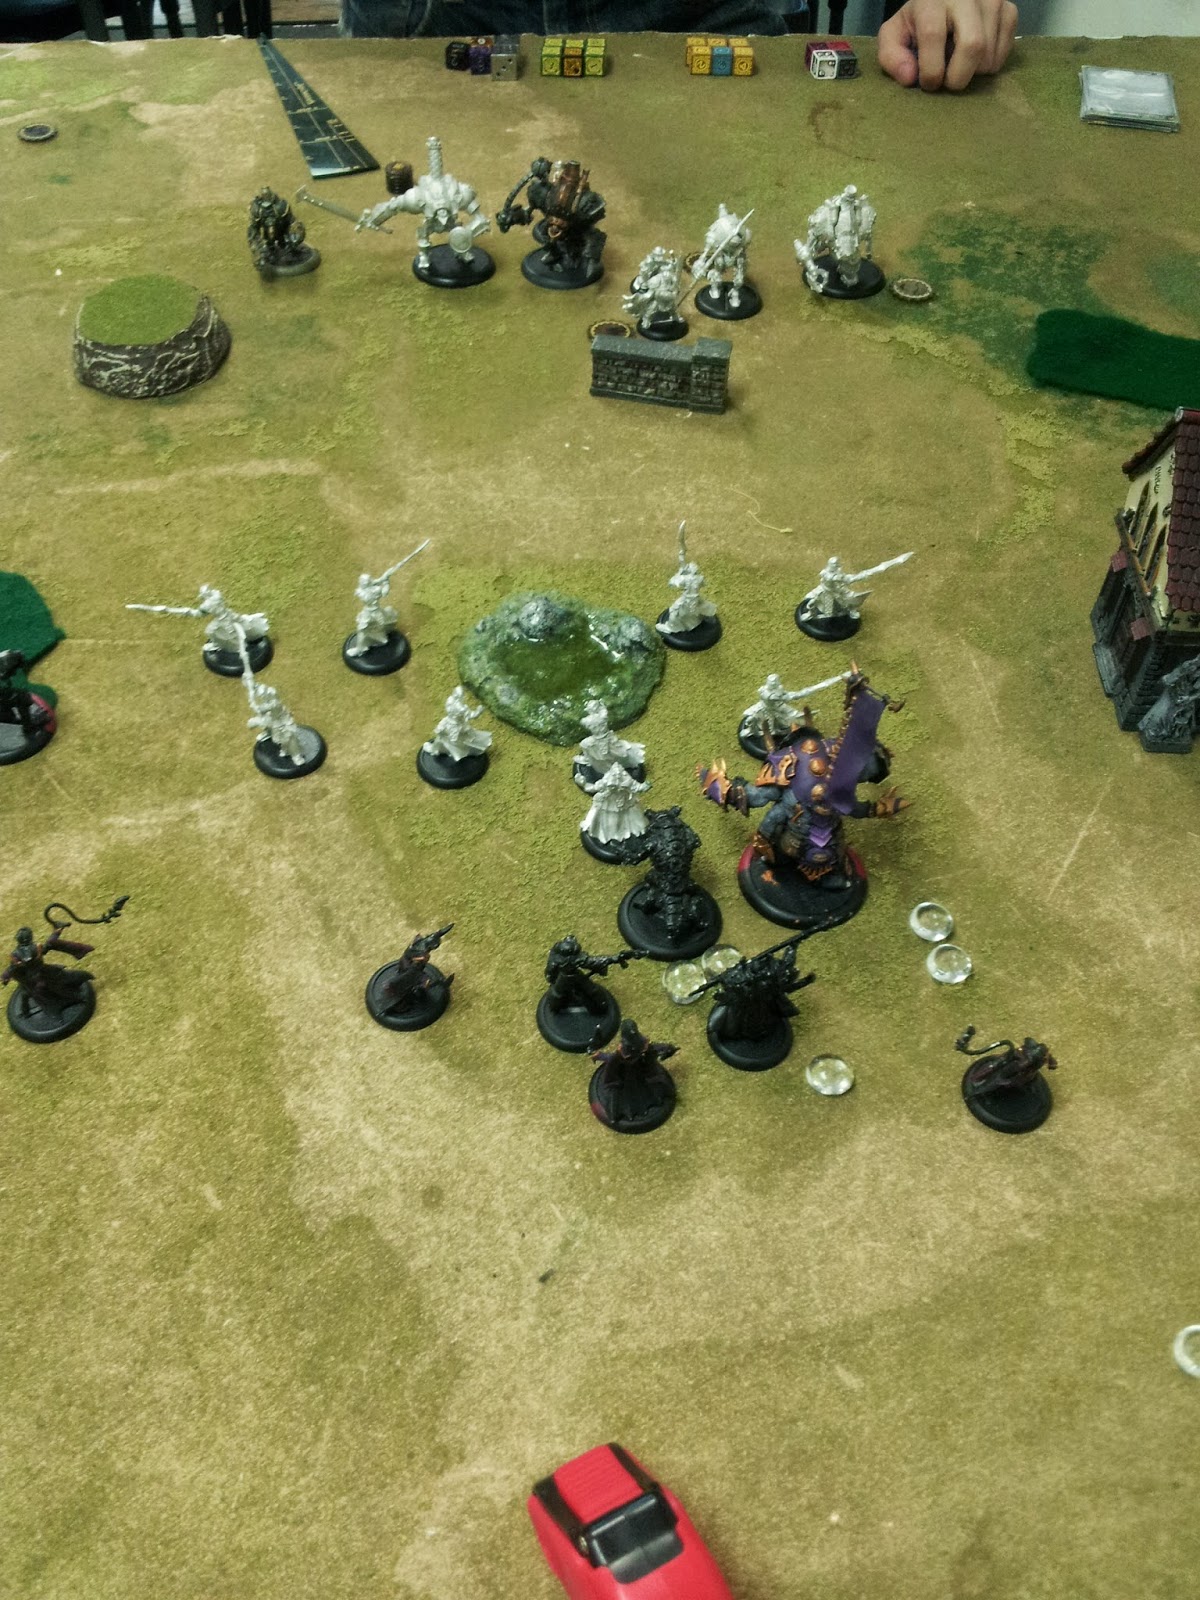
Anyway, I was resigned to loss this game, because she's a power caster. I had recently assembled my Cetratii at this point and wanted to give them a test run as best I could. So I was running a 35 point list of eHexeris, Bronzeback, the Pinball Wizard Molik Karn, a Drake (Bonded), Max. Cetratii, Paingivers, and an Agonizer, and a Feralgeist to fill me out a point. The Feralgeist contributed nothing as he got stabbed by Morrowans.

My thought behind the Drake as my Bond beast is to have him be able to Bushwack to get to where he needs to go and untarpit himself and still deal with key pieces with the fun use of POW 14 SP8s. He never did that trick, so I still want to see how it holds up outside of the Dojo.


My opponent was running the Cygnar Battle Engine, eHaley, Stormwall, a max unit of Morrowans and UA, and a Squire.

The entire match consisted of me weathering a storm as best I could, while being very overly defensive of Molik Karn, by hiding him off to the side out of fear of losing him to big gun shots. The Bronzeback just trundled forward, screened by the Cetratii and the Drake hanging to the side.

I never really tossed the Cetratii into shieldwall, as I wanted them to get the momentum they needed, so I decided to stupidly not have them just walk forward 5 and do the weather the storm strategy.

The Cygnar player pretty much tried to shoot anything he could off the table, which he really didn't/couldn't.
Doing some heavy damage to my Cetratii who were charged by Mini-Feat Morrowans and curtly quickly removed from the table in a very sanctimonious huff on the part of the Morrowans.

At about 2 turns in, I looked at the table and realized the fallacy of all people who play against eHaley. "Oh on my next turn this will go really well for me". Going against eHaley, without her feat, would be actually remarkably okay, just because I managed to set myself into an okay aggressive position. However, he popped feat and made all my dreams disappear as my pieces were ridiculously ineffectual. Except for the Drake. He chose the order my pieces would activate wrong and chose the bonded Drake that was surrounded by two Morrowans to activate before my caster. Letting me clear them out, and toss ashes to ashes onto the battle engine. I did this after wasting 3 Fury hellfiring the battle engine.

I'd have killed Haley with POW 10s if I'd have boosted the last damage roll, which left her with 2 boxes, and if I hadn't wasted a round trying to toss Hellfire at the Battle Engine like it really mattered.

But she had two boxes left, there was a hole in my defenses and she had killed the agonizer last turn, gave the Stormwall focus, backed up and away from the battle engine, and proceeded to kill my Caster on Dice +4.

This one slip up in my opponents turn, is what gave me the chance to nearly win. This shows the thing with control casters like this, you need to know a lot about your opponent and the core constructs behind the games mechanics to be able to get a lot out of that feat. Otherwise, chains just show up you didn't think of, and then your caster has two boxes left after eHexeris pops feat and blows up stuff.

If I had known that the real fear of the list was the SPD 9 POW 20 Colossal I'd have played a lot differently. The electro-leaps on the part of the battle engine weren't the major issue and if I'd just bricked up a little more and started walking 12/20s up the board, I'd have been a lot more stable. I also could have played Molik Karn a little better, by having him be aggressive and on the side of the field away from the colossal so he wouldn't be easily reached. Electroleap isn't a big deal if your caster is in the back, so bunch up your ARM 20s, Box cars only happens 1/36 times, so he probably won't kill shield walled multi-wounds with some Static Cling.

But to be fair, I didn't find her that much of a problem beyond the feat and -2 SPD Debuff. What that does show though is an important rule of the game. You can play defensively by just pushing hard on offense, so powerful moves are used as a defensive strategy. If I had forced her to feat while I had more pieces on the board, odds are I'd have been more successful as time went on,, and still been able to do a ridiculous amount of damage and hopefully clear out the Morrowans with Molik Karn instead of him being a wasted 11 points.

You also definitely need to learn the threat ranges of your opponent, and on gauging those, play as aggressively as is reasonable. They're two important rules to learn, because if Offense is the best Defense, and a pretty good offense, you never go really wrong with pushing ahead and carving out some space on the board.

So, the easiest strategy to recommend, but the hardest to learn was just in Page 5. Play like you've got a pair.


Wednesday, August 27, 2014

Cetratii and eHexeris at 35 points: Thoughts

Hey guys, sorry for the lack of posting lately. I just got back to school and I've been trying to find time to post up my last battle report, which I think will be pretty exciting.

I had a thought today after running a vassal game last night and finally beating a newer players Armor Skew of Menoth. It concerns Cataphract Cetratii. We Love 'em. We love their reach, and their 20 ARM in Shield Wall. We love how they operate, and how they can kill on contact. We also Love eHexeris. Mostly. Kind of. He has good spells, some jack of all trades-y spells and can mow through Infantry heavy lists which is nice for us, as tarpits are never fun to deal with.

However, maybe I just need to learn how to play Cetratii better, but I have a feeling that eHexeris really doesn't get much use out of these Reach Weapon Masters without the Tyrant Commander + Flag waver.

His spells don't really help them out to be honest. Ashen Veil makes them Def 14 vs. Living models. Only living models. Any gun line worth their salt is going to have SOMETHING to deal with Concealment anyhow. Black Spot can help them deal more damage, but Cetratii want to be more defensive.

This is the big problem. We have no way to boost their speed without paying for a 3 point speed booster. So, if you want them to move up the field at a decent pace, we need them to be able to Run/Charge. If we want them to be really survivable we need Shield wall so under eHexy they are walking 5". You are then paying 14 points for a unit that moves 7" at ARM 20. Maybe it's because I'm playing 35 points mostly right now, but that's about half a list donated to this one trick. If the TyComm gets killed, the unit slows to a relative crawl.

I am not decrying Cetratii only their place with a caster that focuses on more abstract buffs rather than Xerxis1 or pMakeda. These two casters, from observation purely, look like they can do beautiful things to Cetratii that eHexeris can't do until he gets to bigger points costs.

When I'm running eHexeris I'd rather screen with Nihilators, and toss in one or two support pieces and a bunch of big beasts so he can work his fury stat to the max. eHexeris is no beast caster, but with that much FURY he needs to have at least 3 beasts with him.

So, until I get enough points to run 50 points of eHexeris, I probably won't be setting down the very expensive Cetratii, except to just learn more how to use Cetratii in their own right.

If you have any thoughts on how to use Cetratii well, or fun tricks feel free to post it in the comments.
If any other new Skorne players have thoughts on the subject, and their stories about using Cetratii put it down there too.

I'll hopefully be updating more frequently now that I'm starting to get into the scholastic rhythm.
As always, Hell Hath no Fury, like a player Skorned.

Monday, August 18, 2014

Skorne Leakage!

Exigence is just around the corner, and only NOW is Skorne getting any real mechanical leaks about what might be coming out in the book. Insrtead of doing a battle report this exact week, I feel like talking about the rumors about the Keltarii and what I think they should/will have, and an analysis of the eXerxis leak that was put on imgur.

With the Keltarii what I would honestly want to see out of them is not AD like everyone else suggests, just because AD doesn't automatically make it great. In the Scenario game if they crumple to a stiff breeze they wouldn't make a good tarpit unit. I'd rather have AD Nihilators so they can be nearly as good as Doom Reavers. Then they can move farther, quickly position/hold zones, and with Reach are able to threaten and hold zones easily. This is not about the beauty of Nihilators and their latent potential, this is about the hypothetical stats of Keltarii. 

These are still Praetorians so they'll probably have Weapon Stats and are probably not getting weapon master. By the screams of all of Rasheth's Agonizers there will never be a day when Praetorian grunts will get Weapon Master. And now I'm going to be disproven at some point and this will be both wrong and outdated. 

Let's see how PP described them:
 The keltarii wield their double-bladed glaives with unsurpassed speed and precision, able to deflect incoming projectiles as easily as they slice through flesh and steel.

Every other Reach SPD 6 Small Based unit seems to have CMA. So let's just assume they have that due to the established precedent. Speed and Precision and ranged deflecting gives us Blade Shield for DEF 15 vs. Shooting. The big question would be a hypothetical third rule. Set Defense is obvious, but does greatly invalidate Karax more than they already are. What I'd hope for more than anything is Reversal or Beat Back. Beat Back to just be able to push, given that pHexeris has Beat Back on his Skorne like weapon, but Reversal makes them a very good unit at just defensively holding a line. Combine this with either Mordikaar or eHexeris and the unit becomes deadly and mean. 

It'll probably be Set Defense though if they play to the defensive angle. If it's to the aggressive angle, maybe they'll have AD. 

Personally though, I'm going to be hesitant as I'd rather see some UAs over a new unit. Unless this unit is particularly good and is at the very least surprising, I'll reserve my judgment.
Something I'm keeping in mind looking at these Keltarii though is the interaction with the Warbeast Pack Skorne is destined to have. The tools introduced in the new book are just as important in what the Keltarii will have as the models themselves. As a whole though, I don't want to be too excited as I anticipate that either PP will surpass themselves and give us something great, or just another anti-infantry unit we don't need. Though we have heard nothing on what the Bug Men do so far, which may be what we really need. Though part of me still prays for 4/6 reach Weapon Masters


eXerxis is kind of dull on first glance. Huge Base = Easy to shoot and Hard to position. His Stat line is decent, and his DEF/ARM is nice against shooting. The Krea was recommended with Xerxis for a long time and is absolutely mandatory now. His spells are pretty decent and just like old Xerxis is born for running a lot of infantry. He suffers slightly from the issues of Huge Base casters of a lack of defensive abilities, and he lost a bit of character that he had when he could walk. He no longer has the orders to give like he used to, and the lack of ballet Cataphracts makes him less able to do movement shenanigans. 

His feat works very well for infantry spam and Ignite will be a fun spell to toss on a lot of units. His feat and Ignite allows for a lot of Crit Fire. However, if your big plan is to light everything on fire you really aren't using his feat right. The infinite control area is absolutely AMAZING, allowing for a hard alpha strike and allows for all of our movement shenanigans to work amazingly well for us. Him with Molik Karn will be nice and silly. This also gives us something interesting: We no longer have to worry about bringing Gladiators in every list for our beasts to have Pathfinder. This gives us a lot more list design space, and combine this with a Ty-Comm and we can get Pathfinder Infantry, and Pathfinder Beasts making our threat ranges all the better.

His Bond is pretty interesting, as it allows us to save on Fury and get more work out of our beasts. What would be interesting is a Mammoth and Raider and Cannoneer with him and some good Melee infantry to let his feat do some crazy stuff with to Hit rolls with some Incindiarii, Cannoneers, and a Mammoth. 

All in all, eXerxis has potential, and I like him, but by no means does he match the hype. He can tank pretty well given the buffs/debuffs Skorne has, but there is an intense risk to having him join the melee. When you can take that risk though, it will be amazing. There will be a lot of experimenting we can do with him, which is always fun. 

If you have any thoughts/theories, toss them in the comments!

Monday, August 11, 2014

Ashes to Ashes, Dust to Dust: Convergence vs. Skorne

This game was my first try at scenario, and one of the few games I came close to winning. I managed to cleverly use one of the spells I'd never thought I'd be able to get any good use out of, and managed to play scenario decently despite a good deal of mistakes that I've made mostly for being still relatively new.
 Had I been a bit more creative, more experienced, and had better rolls I'd have had the game. However, it was a nice optimistic push, as I've been feeling cynical about my capacity to do well recently. A series of tabling losses and defeats give a certain set of expectations that don't breed confidence. However, each one is a learning experience and I hope to eventually post a win for all of you to read.
However, I hope my losses make winning easier for everyone else. This match was close, fun, and showed the power that scenario has to balance the game. It also teaches some good lessons to try to find ways to look for answers in your lists if you don't have an easy answer planned in for it.


25 points of Convergence vs. Skorne

Scenario: Outflank

Convergence:
Warcaster: Syntherion
Monitor
Cipher
Assimilator
3 x Elimination Servitors
3 x Attunment Servitors
Optifex Directive


Skorne:
Warlock: eHexeris
Bronzeback
Titan Gladiator
Cyclops Savage (Arc Node)
Max. Nihilators

One of my problems with Skorne list building wise has been to try to fit in support units. It always seems so difficult to fit them in at low points costs. Skorne also has a problem with trying to find space for it's support due to it being both equal parts necessary and at the same time detracting from the capacity to put in work units. We aren't like Trolls where the supports are absolutely necessary, or like Legion where the Supports can also put in work over an extended period like Foresaken. So, for this list I decided to just not put in any support pieces and have everything do something important.

At the start I was worried about the Elimination Servitors, since if those stayed alive, I'd be losing a lot of Nihilators and slowly lose scenario, and his gun line would eat through most of my big stuff. So already I came in skeptical and nihilistic, but as the game goes on I get to do some clever tricks and take advantage of some fun positioning later on.


Deployment


This game is my first time ever playing scenario so my deployment may seem funny, especially to me. I was mostly concerned about getting my infantry set up well. I didn't. What I should have done is solidly kept them on one side of the board. I was allowed to go first by my opponent forcing me to choose sides awkwardly. I set my heavies on the right, and my Nihilators kind of to the left. I didn't know how he'd deploy his anti-infantry so I just set my Nihilators close to the middle. I knew they would have been gunning for the left zone, but I wanted to be able to respond to later threats. This gums me up a lot later on, and screws over my game. I knew I'd be camping eHexeris behind the wall and letting the arc node join in with my Nihilators to give them some supporting meat and to tag them with various spells/reach his "infantry" with spells to support the Nihilators as needed.


Turn 1

 First turn, I run everything up, and spread everything out as I can to be able to move things where I must. However, I still feel like I made some mistakes concerning not giving them the focus they needed toward the left zone. Hexeris walks up and starts laying down some magical power, giving Ashen Veil to the Nihilators, and spreading around Animi as I need. Rush went onto the Bronzeback, and the Gladiator stayed slightly back because I wanted to keep Rush on the table for as long as possible.
 I figured out early on that he was running a gunline and wanted to avoid it for as long as possible. I've gotten incredibly paranoid recently about my heavies and this game is a bad example of me being incredibly conservative and nervous game play-wise.


He walks some jacks forward, runs his Servitors toward the walls, and lays down some Rough Terrain templates to clog up the Nihilators who'll have to take a hard left toward the left zone. He's not in range to shoot anything this turn beyond the AoE'd Nihilators.  He tosses Syntherion's big healing spell on the backmost Vector.


Turn 2

This is the moment I realize how bad my picture taking skills are as I seem to forget the causality of my photos and realize I forgot to take one. The important principle of this turn is that I realized that I can start having my Nihilators (now in the Zone) that I can start getting rid of his Servitors due to Ashes to Ashes. I target his heavy that is in the middle of the board with Ashes to Ashes, and it gets 5 nearby enemies in 5" clearing out all but one of his Servitors. I charge it with my Nihilator, realize he is out of formation, and feel incredibly stupid. Somewhere he killed some of my Nihilators and ran them off to the side.

This is also the moment I realize that I am terrible at taking pictures at the time of writing.

My Nihilators unfortunately split themselves up due to my terrible understanding of positioning and stupid decisions. One of them tried to charge the heavy to get some damage on it and couldn't attack due to formation separation. Then my Cyclops charged at it, and wiffed miserably on the attacks doing minimal damage. Then, in fear of an assassination attempt, I block up the pathway with my Bronzeback, and hide the Gladiator in cover for fear of getting torn apart by bullets. POW 12 Bullets. Or charge attacks. Those are also scary.


If I could have turned the clock back here, I would definitely be more focused on actually keeping the zones better occupied and getting some use out of my Bronzeback. Who accomplished very little so far, and will continue to be nothing more than a threat. He ends up moving his Heavy jack over toward the left zone to keep me from gaining any contest points. This next turn is also part of the plague of bad playing and shows the important gap between experienced players, and new players.

He moved the Optifex Unit toward the middle of Zone, seeing my Heavies near by the Zone. This causes me to reconsider the idea of charging an exposed heavy, and making the attrition game go well for me so far, as I'll now have to trample through and probably not make it through. But, I also realized I can get some interesting things done with the Cyclops I realize on my next turn.


Turn 4


What I realized was that I could Arc Ashes to Ashes into the Right Zone at the Optifex directive by charging his caster with my Savage. Then, I'd be able to charge the Gladiator in no problem with Rush. What the Problem is though, I had an obstacle. The Bronzeback was positioned to be where my Caster had to be. So, in my brilliance and not realizing that the wall to my right was a run-overable linear obstacle, I had him run to the left, into the Zone, rather than over the wall to engage something, and score up on Scenario. Instead, he ducked left, because since it was a Heavy in my left zone I presumed it was a god-like infantry killer or could just trample through my Nihilators.

Anyway. I Have my Bronzeback duck left. I have my Caster walk up, and Arc through.
Hexeris Misses. So I burned 4 Fury, for a miss. I pop feat. Get it back. Hit this time. So I burned my feat for this. Then, I have the Gladiator put Rush on himself and charge at the far right Vector, and don't do as much damage as I should.

The Nihilators charged at the Heavy and did some damage, bringing him down close to dead.

Here's what I SHOULD have done:
Have the Cyclops put Future Sight on Hexeris, and Charge Syntherion.
Hexeris Charge at the Bronzeback to get in Range for the Arc Node. Arc Ashes to Ashes through.
Kill All of the Optifexes. Charge the Bronzeback over the wall at the Left Most Vector, and have the Right Most Vector get charged by the same Gladiator strategy. If I have to, pop feat to put Rush onto the Gladiator to clear a zone.
That's not how it happened though.

What happened lead to my opponents turn getting me a Counter Charge with my Bronzeback onto the Vector in the left zone, and giving me a wreck marker to work around. He killed my Savage with his caster.
He then killed my Heavy, and Dominated the Zone for 3 thanks to Syntherion casting Synergy.

Turn 5:
I couldn't get my Nihilators over to his zone to contest, leading him to Contest the Zone for a total of 6 points, winning him the game.


End thoughts:
This game was equal parts frustrating and empowering. I felt clever for some of my positioning and like a downright novice for all of the silly mistakes that I made over the course of the game and the fact that I'm still terrible at putting my pieces in a degree of calculated risk.
This was another battle where I had to take the pieces I had and somewhat improvise a use for them, as at the time I didn't see eHexeris's actual Anti-light infantry capacity as all I'd seen where the larger styles of infantry or jack/beast heavy against him.

This also showed me how much easier it is mentally to play scenario and how the game fits into a smoother pace when there is a sense of direction beyond caster kills.

I need to learn how to treat my infantry better and treat them with more awareness with the introduction of terrain into a lot of situations.

This game was one of the more optimistic learning experiences I've had and one that I'm glad to get in as it shows me more options for down the line play.


As a side note: I've recently gotten involved with a Warmachine League at the local gamestore (Scars of Scaen I believe), and while I missed one week's worth of pictures from that, I'll be sure to be more dilligent in the future. I get to caught up in the games to take pictures some times which can lead to problems.

Sunday, August 3, 2014

Amnesia and Armor Skew: Menoth vs. Skorne.

Once again, I have a limitless capacity to remember to take pictures, so I won't have all of them again, but I still have a few. This is against the same person just getting into the game with a fantastic record for kicking my ass. I lost one of the games before this one because of a bad roll not finishing off his bastions. This one however, ended pretty interestingly to say the least.

15 points: Menoth vs. Skorne
Menoth:
pKreoss
Revenger
Crusader
Max Bastions

15 points of Skorne:
pHexeris:
Bronzeback
Cyclops Savage
Min. Nihilators
Feralgeist (proxied by sole Swamp Gobber.)


Deployment:

He sets his Bastions in the middle, His Crusader by the forest, Revenger to my right, and Kreoss by the Wall.

I set my Nihilators in the middle, Bronzeback on the right-ish, and Cyclops on the left-ish. The Bronzeback is my Arc Node. In hindsight, since the Cyclops has better range he would have made a good Arc Node in comparison to the Bronzeback. I thought I'd tie up the Crusader with my Savage, but that was ridiculous and I should have known better.


We'll see what happens as the game goes on.

Turn 1:

Everything runs forward on both sides.

He runs his stuff off to the side  He set it up so that the Crusader can easily get rid of one of my Light Beasts as the game goes on. I can see that he is trying to lock me in with a sort of pincer formation coupled with the armor skew forcing me to choose targets poorly. pKreoss is a good caster with simple strategies, making this kind of a tough match-up for me, but I have a good suite of useful spells.
Fortunately, he never uses Purification in any of the games we've played so far.
I toss the Nihilators forward as far up the board as possible. The  precise positioning still gets to me looking back at the pictures. What I should have done is spread them out a little more towward the right, and space them so any AoEs aren't an issue. However, I left them like the picture, thinking one could deal with the Crusader as a roadbump or something. The Bronzeback runs 8", and the Savage Runs 12".

I should have moved the Savage closer to the right to help out the Nihilators. Then I could have set the Bronzeback near the back of the forest letting his mobility tricks take care of the lack of Pathfinder.

 I Arc Ashen Veil onto them, and toss Arcane Reckoning up on my caster sitting comfortably in the back.


Turn 2:
He walks up his Crusader, positioning it outside the forest, and he spreads out his Bastions as best he can.The Revenger walks up toward the wall, and arcs a Cleansing Fire onto my Veiled Nihilators, deviating over, and killing a guy on Blast damage.
My Nihilators Run and Charge around looking to engage some things, block some lanes, stab some guys, and so on. I have 3 of my Nihilators gang up on one that they could charge toward, taking him out despite not getting much in the way of charge
The Bronzeback runs forward, looking to get rid of the Arc Node in a turn or two.

This is where I run out of Photos, and my memory runs thin. As the game goes down, the game slowly grinds down to a few key pieces.
He pops feat to make sure my Nihilators don't get much work, but as time goes on I manage to whittle down his Bastions.
I have issues with the Repulsor Shield as time goes on, delivering my Bronzeback to that right side of the table to get rid of my fears of spell assassination. The way that it went is that he pushed me back an inch, I push him into the wall, and then advance back an inch, so I stay in melee range.
With the Bronzeback I forgot Hyper Aggressive a lot, but it's a damned good ability.
At the end though, we had it in a Cold War where Kreoss was screened by his Heavy with both in the woods, and I was behind a wall with only my Bronzeback.
Since it would be a long, grinding, series of turns we declared me the victor and shook hands at this point. What I'd have done is arced Hellfire onto his Heavy, and since his charge threat is still ridiculously reduced I'd be able to have my Bronzeback walk forward an inch, and then initiate a charge, eat his heavy alive and then try to arc hellfire onto his caster, stupid though that may be. Then, either he tries to kite around my heavy for a turn, while trying to toss fire on my caster.

As said before, total nightmare, but it got me a win!

It also taught me the value of scenario to prevent nonsense like that.

this also shows that I really do hate armor skew, and that I really hate Bastions.
I feel to combat elite infantry is to start trying to invest in my own. I love Nihilators. They have Tough, Reach, good Speed, and drown stuff in bodies, and can toss around some damage. However, they aren't as good at dealing with Bastions as I'd like. While they become nigh invincible with Ashen Veil, except against sprays, they don't do enough damage tor really deal with Bastions under D-Ward. Especially due to the lack of Knock Down tech that I have at this point in the list. I might invest in a Task Master and Gators, or Cetrati, or both! I feel that it is a good way to deal with this Armor skew that can shift damage by dealing a lot of damage everywhere, and risking my Heavies to do that isn't a good idea.

This round though, I just need to put better work out of my beasts and remember my basic lessons of not spreading out so far. If I hadn't charged in with my Savage, his Crusader wouldn't be horribly useful as it would only kill one or two Nihilators rather than a whole beast.

This match showed that I have a lot of issues with piece prioritization, and don't focus on the important pieces at times, and try to scatter out and cause mass damage, rather than focused strikes. If I keep the important pieces near the Forest, I wouldn't have had to worry about the Crusader. I would then have probably killed the Bastions sooner. Then I would also have more Nihilators. Then I would still have gotten rid of his light jack, and secured half of the board, and been able to whittle down his Crusader without as many lost pieces.


As a whole, I need to take the lessons I give to heart, and focus on the biggest pieces on the table, which so far tend to be Heavy Infantry. The Meat Mountain is in full swing at my tables, so I have to build up to represent that.


Sunday, July 27, 2014

Pauldron Problems: Heavy Infantry

Today, supplementing the usual battle reports I produce once a week, I have decided to try to delve into an issue that might be present to some more recent players into Warmachine/Hordes, and Skorne in particular if you've followed a buyers pattern similar to mine. Heavy Infantry. If you don't have any Multi-Wound Infantry, how do you deal with Multi-Wound Infantry? Specifically, High ARM Multi-Wound infantry.

These are a unit type I've had particular problems with in a lot of my games, and at low points levels, they are typically more efficient than large blobs of infantry. They are more survivable, meaner, and with a lot of UAs and solos that increase their hitting capacity/survivability it becomes a train wreck. One of my Orboros matches vs. eBaldur was completely obstructed by poor positioning of my Nihilators, my Gladiator, and the high ARM of his Skinwalkers. My many matches against Menoth are difficult against Bastions, as he still easily has full units when he should be down 4 or 5 men in the Unit.

Sadly, as I am yet to own Cataphracts of any kind, I have no strategy that involves fighting fire with fire. This is one of the simpler strategies. You have ARM 18 Weapon Masters? Well, I have ARM 20 9 inch Walking threat range Weapon Masters.

But for those of us not yet running Xerxis and his wall of Cetrati, I'll break down some of my thoughts on how we can deal with this problem unit type.

1. Shoot it off the table. This is more of a Cygnar/Legion strategy at it's core, but we have uses for it, and ways to do it. Cannoneers have healthy POW 15 guns, sure it turns into Blast Damage for everyone not in that central unit, but it can be a good way to disrupt shield walls if you aim it right. Couple it with a Cyclops Raider, you can shoot them before they even get near the center line. Couple this with a max Squad of Reivers + UA and a series of CRAs, there are going to be some dead infantry on the table. Use the Mini-Feat turn 1 along with the Cannoneer, and you will at least soften them up before they get to your melee center.

2. Continuous Effects: Yes, this is typically for light infantry, as it will lead to them dying in droves, but anything helps when they have 8 boxes to chew through and your Bronzeback, no matter how many he pushes around, can only be in threat range of a well spaced 5 man unit for so long. Venator Slingers are a good idea here, as they can lay down some early turn Corrosions, and can be easily tossed away due to their cheap 6 points for a max unit, letting us get in some shots and cause a road bump in the center line after laying down some more light damage to soften up Multi-Wound Meat Mountains. Incindiarii could also fulfill this role well, but due to still having to roll at dice mins 6 means that it is less reliable.

Now, combining these above 2 would be incredibly taxing on points, costing you around 28 points for a lot of whittling down effects, leaving your core less versatile than it otherwise would be, so this is something to consider more lightly than the other options, though when focused well, can create good effects on the battle field. I'll be looking to try Venator Reivers soon with eHexeris. It seems like a good way to harm D-Warded Black Spotted Bastions in CRAs. Groups of 3 Reivers CRAing at something, for dice - 4, if aiming needing only 4's to hit, inflicts a good bit of damage, gives out about 3 Damage per Bastion on average. This, gives you more points to build a center around, and is a good way to weaken Bastions or other Heavy Infantry before they become a problem, and if the Venators survive, they can be useful in taking down 'jacks also if they survive the coming onslaught.

With the above strategy being more difficult to implement points wise and not in Skorne's mentality of "Kill, Crush, Destroy" we have to consider other options if we have no Heavy Infantry of our own.
If we throw our beasts at Heavy Infantry poorly, they're doomed. Weapon Masters, and durable infantry are a death trap for beasts consigning them to uselessness, or death.

So, the other option I give is

3. Find a way for the positioning to render these units useless. Against some armies, this isn't that good of an idea, Circle comes to mind, but against slower Heavy Infantry, we can try to take advantage of Skorne's capacity for surprising movement to change our place on the battlefield and force them to choose bad targets/not move very far. This is more of a vague and personal way of analyzing the problem, but we do have some tools to ensure that we can divert their attention. Molik Karn can do good Hit and run strikes on these Multi-Wound Reach Units, with the benefit of things like Rush/Abuse to get into Melee, killing one or two, and then Side Stepping back, and using Fate Walker to get out of easy reach. Followed by having the rest be forced to deal with a tarpit unit, so they'd be forced to take Free Strikes if they diverted their attention could be clever. However, Molik is the easy response to give to these questions. The Archidon provides a similar role with Flight and the Lightning Strike Animus allowing for it to be a good way to kite heavy infantry, and maneuver as needed, and also to force the infantry to choose what threats to consider.

In the maneuverability department, I'd also say that other than pMorghoul with the delicious spell Admonition, I support that Mordikaar is for all of our "I'll move where I want" casters. With Ghostly, and a defensive feat that allows you to Push targets out of melee threat, and revive models to move into good positions to take down big targets. All this makes him great at avoiding danger, heavily influencing the enemy to make their big meaty infantry not as dangerous.

A way I'd find to deal with this all on a strategic level would be a sort of reinforced flank maneuver depending on your force composition. Particularly this works if you go second and your opponent tosses his Heavy infantry on a flank.

My final piece of advice would be to save your heavy or light beasts until the infantry are already engaged in melee, say with Nihilators, and then take advantage of their relative proximity to implement these other strategies by picking off ones at the sides, kiting them in, or even shooting them before they become engaged, or any that had just become unengaged, and so on.

Eventually, we'll cave and get Cetrati, but for lists that don't include those the Meat Mountain is a particular way of doing Armor Skew that we need to think about and how to deal with. When killing a players models is so intensely difficult that we can't take much damage without fear of never reciprocating said damage then things become difficult for us Pain Givers because we love inflicting damage.

If you have any ideas, toss them down in the comments, and play well, play hard, and play Skorne.

Tuesday, July 22, 2014

Risk and Reward: Mercs vs. Skorne

This week I went up against Mercs again. I'm glad to show you my newly purchased Nihilators finally on this page, but also to give you a bold realization I've had. Something that probably has been holding me back on a more subtle level than my lack of experience.

Mercenaries vs. Skorne 25pts.
pMagnus
Nomad
Renegade
Mangler
Buccaneer
Freebooter

Reinholdt Gobber Speculator

eHexeris
Titan Gladiator
Basilisk Krea
Cyclops Savage

Max. Nihilators
Min. Beast Handlers

Aptimus Marketh

As I'm typing this, I just realized I was down a point. For some reason I'm terrible at accounting with eHexeris...

Deployment:
As always, I lost the go first roll.

He covered all of his jacks pretty straight forwardly, the light was on my left, pMagnus in the middle, and his heavies near by. I was immediately nervous about all the Knockdown effects that seemed to be everywhere here as I have no real responses to Knockdown.

I set the Nihilators in the front, and was nervous about how I'd move them around the board. The Gladiator is to the right next to the Krea, and the Savage takes left. eHexeris sits in the back of it all, with the Aptimus next to him, and the Paingivers spread out pretty well.


 Turn 1:
He tosses Blur onto pMagnus, Snipe onto the Buccaneer, and runs things forward.

I run my Nihilators up 10" (more or less), and everything runs up. Aptimus tosses Ashen veil onto the Nihilators, and Hexeris tosses Arcane Reckoning on himself as he has nothing to really toss around. Magnus is really well shielded this turn due to the wall, and my offensive spells are out of range.


The Krea has it's Animus up because the less chances I have for him to tie up one of my beasts or my 'lock I can give the better. I leave Hexeris screened Hexeris well, but I left my right flank a little expose, and didn't move my Nihilators up far enough. However, I did get them all in the tiny 7" command bubble, so I made an improvement there.


Turn 2:
He misses on most of his shots that he tosses around, and shuffles around a smidge. He blocks off a charge lane to his caster with his Nomad.
I have the Nihilators run/charge and do their best to block lanes and to try to get to his caster. None of them manage to hit his ridiculous defense through the Cover. Most of them spread around and kind of clog up my Titan.


I managed to still keep Hexeris well protected just by these two light beasts. I upkeep Arcane Reckoning on Hexeris. He had set Reinholdt off to the side and I killed it with a Nihilator which I quickly realized is a waste of time/points. My Savage runs off into the woods to give more control to the left flank.
I quickly realized at this point I should have concentrated more on the right as that is where more of his jacks were. I spread out too far over the course of this game not allowing me to get any holes into him.


Turn 3:
He has to pop feat to get at my caster, which I take as a compliment to how I kept him hidden. However this means I have to deal with a Freebooter behind my lines who wants to hogtie my caster and toss him onto that rotisserie spit of a spear he has. This causes this next turn to be incredibly flubbed. He also moves over his Buccaneer to knockdown my Titan. Which I'll force back to normal on my turn.


I used my Nihilators terribly so I was wasting 8 points a turn. Anyhow, he popped feat to maneuver his stuff around, and failed to knock down my Titan again. He shielded his caster over on the right side of the field, which left my Cyclops pretty useless, as it had been all game. I have it run across the board to try to block a charge lane.

This next moment is me auto-piloting through, so I have to apologize for the absolutely titanic stupid I was operating on. The Titan tried to slam and was half an inch shy of actually getting the charge benefit on the Buccaneer and I bought a boat load of attacks which did functionally no damage. I couldn't quite figure out how I was going to deal with this thing. What i should have done was used Hexeris to get toe to toe with the jack, along with the Krea. Instead, I had the Aptimus toss down Hellfire on it, have the Krea start hitting it, and then waste piles of fury on Hellfire as he moved into difficult terrain which I thought would have given me cover.


Turn 4:
Since I messed up that turn beautifully, he has me dead to rights. He uses the Obliterator Rocket to knock down my caster, has the Buccaneer kill my Titan, and then has the Free Booter hit me for more attacks then I can transfer to my beasts.


 I mismanaged a lot of pieces. I thought that covering the board would be my path to victory, when in fact it's about making a series of strong decisive moves over board presence. I over estimated how much he'd use the pieces he'd have on my left side of the board. I was most of all frantic over how I'd make the Nihilators useful, largely because I underestimated the value of charge attacks at 3d6 - 6 on his heavies.

 He used his low model count to force me into the encounters he wanted. I was distracted by pointless pieces and fear of AoEs. I was also scared of the imaginary threat of a deadly trample to my caster.  In this match I find that I don't move far enough up the field, and I try to play incredibly conservatively rather than taking risks.

So my big revelation is to take Risks, and invest all your pieces to all capacity without fear. Stupid risks are one thing, but well backed risks are different. I valued my Nihilators and didn't find a use for them due to skepticism and not having the right match up for those pieces in particular.

On a positive note, if I had scooted the Nihilators slightly to the right, I was still good at denying shots to my caster, and will need to walk away with a lesson on how to keep him from being targeted.

Monday, July 14, 2014

I GOT BLISTERS ON THESE FINGERS!

The past couple of games I've done a terrible job of taking enough pictures, and the sad part is this happened in the first game I played with my new Nihilators.

However, as this is dedicated to new Skorne players, either veterans coming to Skorne, or more likely, new players who were drawn to the lash, I'm going to make this post dedicated to the horrible pain of assembling Skorne models, with advice from what I've heard from others and what I recommend.

This entire post is brought to you by Nihilators, the most limp-wristed hunks of pewter that have ever been cast.

The first thing that you have to understand is that assembling these models will sting and hurt, because everything is covered in what look like tiny spikes. These will, in turn, slowly feel like someone is digging into your skin with a cleaver. What I recommend for dealing with that is trying to find a comfortable position and move the model around to make sure you can still apply pressure and at the same time. It can be tough to find, but anything to get to either less prickly parts of the Paingiver pear, or just to balance things so more surface area of the spike is against your palm/fingers.

That's logical though, and I don't have to go into too much detail on comfort. What I'll be talking about first is one we've all experienced as logical Skorne collectors. If you got the metal version of the Battle Box, or just realized Gladiators are great and bought a metal one, there is the critical flaw in the Titan Gladiator. The Titan Gap. A huge gap between the upper and lower torso that we all know and hate. It's exposed and ugly.
What you use is Green Stuff.
It's an epoxy modelling putty, and it is good for conversion work, or for putting together angry elephants.
What you can do is get the Green Stuff prepared into a donut, set down the Gladiator, and then blend and fill in the gap.

Savages are also difficult to assemble because of how poorly they want to fit together due to the flat surfaces on the arms and the arcane way the arms have to align in the most arcane ways. In all honestly, I recommend scoring the surfaces, holding on, and praying when you get around to actually gluing them. What I'd also recommend is carefully preplanning so the arms fit properly. Particularly the Savage with both hands holding different parts of the sword, which is one of the most insidiously ridiculous design choices that I've seen and had to deal with.

Speaking of ridiculous arms. Nihilators. Nihilators are one of Skorne's best tarpits and you will have a unit of them. And most of them are easy to assemble, and most of mine are durable and fine. But, Oh My God, who ever things that Falchions should only be attached to a model at a wrist is an imbecile who seems to have no understanding of physics. The Leader of the Nihilators, who I am here referring to as Hannibal
I wonder if he keeps his fava beans in that face mask...


That Wrist joint has way too much weight on it, and I offer no salvation to any sort of drilling in all the arms on your Nihilators. All your nihilators will cause you one or more problem. The ridiculous pain hooks that inflate their chests like steroids will hurt your fingers and the arms will never stay on. You'll have to break out a hand drill and pins to keep the arms decently on, and I am still working on getting one of those.

This serves as warning and advice for model assembly.
Welcome to the tortured peoples, the masochistic. They're creepy pain Buddhists. You knew this is what the faction's aesthetic and design philosophy is, you brought this suffering on yourself.


Saturday, July 5, 2014

It's Strictly Business: Skorne vs. Mercenaries.

Unfortunately, this game doesn't have any pictures because my phone died.
This match has pushed me to start playing eHexeris instead of pMorghoul.
It was a 15 point game, and I was eager to go up against Mercenaries, as it's hard to find full on Mercenaries players.

Mercenaries (15)
Ashlynn D'Elyse
 - Nomad

Tactical Arcanist Core
Dannon & Blythe
Aiyanna and Holt

Viktor Pendrake
Reinhold Gobber Speculator


Skorne (15)
pMorghoul
  - Titan Gladiator
  - Cyclops Savage
  - Basilisk Krea

Swamp Gobbers


He won the roll to go to first, and he scattered everything pretty far around since it was mostly solos and small units. He had Dannon and Blythe prey the Savage.
I bricked up like I typically do, using the Krea and the Savage as a screen for the Gladiator.
Morghoul sat to the right of the Gladiator.

He puts Admonition onto Ashlynn, and tosses Quicken onto the Nomad.
The Tacticals walk forward getting no meaningful scatters out of their Firebombs
D&B get in position, along with Viktor Pendrake. Reinholdt stays in the back. The Nomad walks to the side.

Given that he has more board control, higher armor on an equal defense caster to my own, more focus, and a better spell suite, I was scrambling to figure things out, so I just continued to brick up, trying to not get alpha struck to any capacity. I let the Gobbers run up the side and pop smoke to block LOS to anything from the two arcanists, and I brick up and walk forward.

This being my first time dealing with Prey, I didn't realize to try to get the Savage to a safer place, maybe to the left instead of the right, and have him try to pick off the arcanist core.  The Krea was to the left of the Savage.

During his turn, D&B massacred my Savage thanks to stacking damage buffs and made the Krea their next target, which was quickly killed due to attack multitudes from Bull on his Backswing. The Arcanists failed a lot of to hit rolls, as did Viktor with his Bola. Some of the Arcanists/Aiyanna and Holt started wailing on, and missed, a gobber. The Nomad, having no good charge targets, just ran off to kill a Gobber.

Next turn, I have the Titan Gladiator slam into an arcanist and try to knock down Ashlynn, but she had upkept Admonition and ran 3 inches away, and I kill myself an Arcanist. I have Morghoul pop feat and avoid D&B.

Viktor and Ashlynn do their best to kill the Gladiator but he is operating well, and Viktor misses with his Bolas again, Ashlynn pops feat, leaving my Gladiator with a lot less boxes, and making all my attempts fruitless during my turn to wail on him with my Abused Gladiator, as he ripostes my Gladiator to death.

I had Morghoul put Admonition on himself, being unable to reach Ashlynn to start trying to kill her I move him close to the center of the board and pop feat to keep from doing anything useful.

Viktor missed with the Bolas AGAIN, and I ended up being cock blocked for my next turn by Reinholdt who runs straight across the field base to base with Morghoul. I choose not to Admonition out of the way for fear of certain doom.

At that point I get killed mercilessly by Ashlynn who walks up and murdernates him thoroughly.

I pretty much went up against a better version of Morghoul that night. Better by leagues. I was sufficiently done with Morghoul at that point, having a pretty big W/L record with him at this point of  2 - 13.

Maybe it's the low points cost making his utility less apparent, but at the same time, I need to practice with someone more generally useful to get some more experience with winning strategies. Morghoul can't interact with opponents at all, and his low control area and squishyness makes him hard to use if you can't pinball out on low hit box infantry.

For a long, long time now, I'll be setting down pMorghoul until I get deeper into Skorne in terms of available points to play with.

Thursday, July 3, 2014

Treatise on Morghoul: List Architecture and Building

Now, after all this break down and analysis and rambling from last time, let's get to list building with him. I'll structure this at 35 pts.
He wants to run a lot of beasts despite the 5 FURY. We have the Beast Handlers mitigate fury to what ever we need, he can take any excess and take advantage of it with Maltreatment. Which, if cleverly used, can allow him to take his 14 attacks on max fury, and by stealing fury from beasts you've already activated, can give you even more attacks. Further, he has 7 Warbeast points guaranteeing room for at least one heavy, or in some cases, an essentially free one (X-idons).
                             
Starting off with the beasts:
Titan Gladiator. This is definitely recommended. It's animus is a good source of Pathfinder, and a free Movement buff in a typically SPD 4 faction is always appreciated.

Taking a Titan Gladiator makes it easy to take a Bronzeback and is a perfectly valid decision, as it helps even more with Fury management, by guaranteeing successful Frenzy checks if it becomes necessary. Further, there's just an inherent synergy between the two.

What we want to make sure is a couple things in this list, beyond two fantastic heavies.

1. How does our list keep Morghoul safe?
1a. What is Morghoul weak to?
2. How does a beast heavy caster deal with multiwound infantry (since Morghoul can deal with single wound just fine)
3. How do we make sure the fury on the table is being used efficiently?
4. How do we fit in even more fantastic heavies to all of this?

I ask these questions because with Bronzeback and a Gladiator in the list, we can crack armor open easily, so no need to worry too much about armor skews. Except for things like ARM 20 8 Box infantry thanks to Shield Wall. That will come later.

Morghoul's weaknesses though are as follows:
Knockdown: His DEF 17 is what saves him from most attacks. If his armor is all that protects him, our caster is dead. Period.
Ranged Attacks/AOEs: Blast Damage can kill him, and aiming on most ranged attack oriented models can lead to him being hit more often than you think.
His own Control area: 10" isn't much. It's easy for him to over commit and die due to his tiny control area.

So we need stuff to: Protect Morghoul from Knockdown, Ranged/Blast Attacks, and something that allows his control area to be expanded.

What first comes to mind as answers to these are:
Knockdown: Cyclops Brute
Ranged/Bast: Basilisk Krea
Control Area: Mortitheurge Willbreaker.

The Mortitheurge Willbreaker is almost an auto-include in my opinion, just because it lets the beasts we've gviven hilariously huge threat ranges to, the capacity to still be forced out of our control area.

If you keep the also Auto-include for Morghoul Pain Giver Beast Handlers at a good angle, then they can rinse off all the fury you need.

The Cyclops Brute is useful for the Animus to protect Morghoul from Knockdown, and Shield Guard is also a good ability for keeping Morghoul safe.

If you want to toss in another heavy to take in the Shield Guard role, you could use Tiberion, but the Cyclops is lower on points, more utilitarian, and while he can't be slammed anywhere, Morghoul is still vulnerable, despite hiding behind it. It could work, I'd just need to try a couple games with it to see if it works.

The Krea is a good Utility beast with her gun locking down Run/Charge on key Beasts, lowering DEF to 7, and has an Animus that can keep Morghoul alive during AOE heavy turns.


So with this in mind we have

pMorghoul       (-7)
Titan Gladiator   (8)
Bronzeback     (10)
Cyclops Brute    (5)
Basilisk Krea      (4)

Troops:
Max. Handlers    (3)

Solos:
Mortitheurge       (2)


So we have 25 out of our 35 pt. list done, and answered our first question.

Next, how are we going to deal with Multi Wound infantry?
This is answered in different ways at different times.

Is it Shield Walled infantry?
I like to put Admonition onto a heavy, and strike near the edge of Shield Wall lines, breaking a hole open in a unit, and having it swivel around when one of the members of the unit is in 6" during his turn, sticking a heavy  behind their lines.

Is it just normal High ARM, Multiwound infantry?
Then we either must combat with infantry of our own, or find a beast that can do that.

The last thing we want is our beasts to get caught in a tarpit, because what'll happen is what happened to actual Mammoths in the real La Brea tarpits. A slow, slow death.

So we have a couple of options:
Try to poke a hole in it
Find a way to ignore it, creating wasted points on his part, giving us an advantage
Fight Infantry with Infantry
Or find a way to smash it into paste.

We can Admonition/Beat Back our way through it
We can use an Archidon to fly straight over the multiwound infantry, and giving a heavy Sprint is a good way to get out of a tarpit anyhow.
We can toss out a unit of Nihilators to act as a screen for our beasts, and as a way to gain more board control. Possibly you could include a unit of Gatormen with a task master.
Or you could toss in a Rhinodon to deal with it.

The poor, poor Rhinodon. Dismissed by the community, but having a secret, masochistic use with pMorghoul. Since it can be Abused and Enraged to get good threat ranges, and suddenly get POW 17's and 18's, it can do a good job taking out High ARM infantry walls, plus it's Animus makes Slams easier to pull off for cheap amounts of Fury in comparison.


So we have the answers:
Movement tricks and Flying
Nihilators/Gatormen
or Rhinodon.

Some of this is a matter of taste. I like the idea of Yo-Yoing Bronzebacks to create a Molik Karn with tusks (what's not to love?), the Rhinodon is a cheap and simple answer while sticking to a beast heavy theme.
Nihilators/Gatormen w/Task masters are good self sufficient walls of churning death, and can easily take up a lot of board space.


So for this role of Screening Unit/Anti-Infantry we are definitely investing 7-8 points. Which is quite a huge sum. We need something that can keep our heavies safe for a turn, soak up some hits, block some charge lanes, while still providing utility.
Since most of our lights in this list are not exactly screening material, and more utility material with a key purpose later on, I'd recommend not screening with those. Therefore, I think we should take the infantry  route.

For 5 points we can get 6 Nihilators.
For 8 points, we can 10 Nihilators, or 3 Gatormen Posse w/Task Master.
One is a wall of Tough, Reach SPD 6 Infantry, that can die in droves and there is no regret. They can cover the board out to a lot of angles, and serve the purpose of either clearing up that first wall of infantry, or taking attacks from opposing heavies. It can be a total of 6-10 boxes of Warrior models.

The Gatormen, like most of Morghoul's list, brick up. They don't cover as many areas, but can hold a central position really well. They are conceivably 24 boxes of medium base, Tough infantry, with Reach and the capacity to take a shot and quickly move toward and eat infantry. They are much MUCH better under Rasheth, but they can still do work here.

If you really want to get in more Gatormen, you could drop the Krea to fit in a Max unit + Taskmaster, to get 40 boxes of centralized screening, but that's a lot of points put into a unit Morghoul can't interact with.
However, Gatormen can't be trampled, making them more effective against heavies and as a good meat grinder for infantry.

Morghoul has a lot of issues when it comes to board control, beyond his feat. He wants to brick up and walk a lot of the time, having a slow moving first turn, and then exponentially increasing threat ranges and speed on his beasts. However, you can't trust a wall of infantry to always screen your important beasts when heavies can just trample through them. In most cases though, if you spread out your infantry well, they'll be farther up the board relative to the rest, and your opponent can't trample through all of them.

So I'll say a max Unit of Nihilators for now, and definitely experiment around with the system to get everything worked out nicely.

With that, we have 2 points left, which can just have an Agonizer in it to help make life harder for your opponent.

So in total, my recommended pMorghoul list for beginners and new Skorne players is:

pMorghoul
Gladiator
Bronzeback
Krea
Brute

Max. Nihilators
Max. PGBH

Agonizer
Mortitheurge

All adding up to 35 pts.

I will be experimenting around with this format, while also getting to know eHexeris over the next couple of weeks. As I'll soon be able to afford some infantry.

So break out the pain whip, bring your beasts and have fun experimenting around with this list, and variations, in your games.

Tuesday, July 1, 2014

A Treatise on Morghoul pt. 1 Musings on Morghoul

In my most recent match, I realized that along with my capacity as a player I need to change the models that I use to make pMorghoul shine. So today, I'll be doing some List Crafting to try to figure out what I need to update and what fellow Skorne players that like how pMorghoul operates could run him. Over the next couple of days, I'll be examining what pMorghoul can do, what he wants to use, and what he should use in a list.

To do this, we obviously need to take Morghoul apart piece by piece and figure him out. We'll be pretty orderly about this and break down his card front to back, to give an order to it.

Stat-wise, the first thing that jumps out at me is the SPD 7 and MAT 8. More than anything SPD 7 just because I spend half my day trying to figure out how to get SPD 4 to reach it's target. the MAT 8 Speaks of his capacity as a melee caster. DEF 17 and ARM 13 give an illusion of survivability, by giving him the capacity to survive by the skin of his teeth, since any hit that he receives will probably leave him down half his boxes. This also means that I need to be worried about AOE's and Blast Damage, since you can Boost Blast Damage, making even POW 7's of Blast Damage work at 3d6 - 6; giving him about 4 pints of damage PER AOE. Hell, he will be at serious risk if anyone ever gets him stuck with Continuous Fire. POW 12's WILL kill Morghoul with enough application. Especially

He has 2 pretty weak looking initial attacks at P+S 9, so given him being structured as something of what looks like an Assassin style caster, he will have a special trick probably later on to make these useful.

His 5 FURY really holds him back from doing a lot on the field, and means we really have to work hard to make sure that Fury is well maintained on the board. So, for any Spells that he has, we'll need to do everything in our power to not have him use his Fury too much in any given round. He'll probably bounce 1 or 2 spells in a round, to keep one Transfer on himself.

Now, no Caster is complete without Special Rules, and his is a fun wall of text.
Anatomical Precision allows him to always get some use out of his Attacks, and he is able to both control fury on the board in the traditional Skornish way by harming his beasts with Maltreatment. It also lets him always have some form of transfer fury at the end of his turn. Overtake lets him move one inch when he destroys a warrior model, and Sprint lets him take a Full Advance when his activation. Perfect Balance keeps him safe from Free Strikes, Backstrike Bonuses and CM/CRA's. Further, if he's Knocked down, if he survives the turn, he can stand up without missing out on Move or action.

Finally, his weapon gives him 2 attacks whenever he buys one, and he can hit beasts to add or remove fury, giving him a capacity to mess with your opponents Fury management, but if he does make contact with your opponents beasts, there is an honest problem there that should be remedied immediately.

His Spell list is interesting, short, and to the point. Torment, is a RNG 10 POW 12 that stops your opponent from Transferring Damage and stops Tough checks on an individual model. This solidly cements him as an assassin caster. Interesting note: His Charge range is exactly 10", as is his Control area. So, if this spell is able to connect with it's target and your battlegroup is in 10", then you have at a basic level gotten things well positioned. Screening and such is more of a context oriented matter, but all this means you have the decent chance of having a very successful charge available.
Abuse is simple, and spammable. It gives +2 STR and SPD. It makes our threat ranges stronger, our beasts bigger, and combined with Enrage can turn our most pillow fisted beasts (Any of the X-idons we have) and makes them able to wreck properly, while still keeping niche utility.
Admonition is one of my favorites in his list just because it gives a lot of slow pieces interesting ways of getting into position, and surprising your opponent. When an opponent's model ends it's movement within 6" of the target model, you get a Free Strike free 3" advance.
This is spell makes me really like Morghoul. It lets us be tricky like an assassination caster has to be. It let's me surprise my opponent and give a chance to react to what he does.

His feat, Pain and Suffering, stops your opponent from Spending Fury/Focus or Forcing his beasts.
That is huge. It is a beautiful piece of one turn board control. It is one turn that you can play to completely negate your opponent's plans and give all his pieces a hard reset since he can't cast Animi, and has to drop his Upkeeps. It's a good way to make sure your opponent's pieces are vulnerable. Further, the question of whether you are going against Hordes or Warmachine Armies is whether the feat can be used offensively or not. Warcasters would have to camp their focus, making them harder to kill with Morghoul, even if he automatically gets one point of damage in. However, against Hordes, it leaves Warlocks unable to transfer on feat turn, allowing you to buy multiple attacks and rip them apart one point of damage at a time with a theoretical 14 attacks.

It can be used defensively, but given pMorghoul's aggressive play style, he wants to use it to keep an opponent from responding to a harrowing assault. It will keep him from buying attacks, from casting spells, and lets you take a lot of risks, though you have to be careful of your opponent's charge ranges, as they can still charge if outside of that 10" bubble.

So, he's an Assassin caster that wants to keep everything he uses nearby, while having to decide on when and how to boost threat ranges on his beasts with no real spells to help warrior units. Seems pretty simple.

Next time I'll be posting about what pMorghoul wants to use in a list, and build a 35 point list in the next article. Here's a sneak preview: He wants to use a lot of beasts.

Thanks for reading, and may Pain, Misery, and Agony befall your foes in a manner too horrifying to consider.


Sunday, June 29, 2014

Crushed by the Copycat...

This Thursday I went up against another Skorne Player. Another, PURPLE Skorne player.
I'm glad that I managed to retroactively inspire my fellows before I even arrived in this meta. It's a proud moment to know that my genius ripples across the universe to my local store. It even inspired him to kick my ass! It's a noble, proud time to know that I can inspire indirectly so, so well.

This round was a list of mistakes, and realization on the value of some of my models. I forgot some of my own lessons because I showed up really late to game night, and it had been a week, but I also made some legitimate issues. I hadn't screened my heavy properly, misused and misactivated some pieces, and made poor use of Morghoul again in a similar way to what happened against Circle. Also, I did Pop feat this game, it just didn't make any use due to Caster Cowardice, as I'm now calling it. It's when you keep your caster out of the fray to the detriment of the caster's utility. It also made me realize that there is greater utility in a different 1pt Minions piece that can cover my major issues, which I'll cover in my post game thoughts.

My Skorne: 20pts
pMorghoul (-7)
Titan Gladiator
Cyclops Savage
Cyclops Savage
Basilisk Krea

Min. Handlers
Swamp Gobbers
Agonizer


EEEEEVIL (but incredibly similar) Skorne

Xerxis
Tiberion
Bronzeback

Mortitheurge Willbreaker
Max. Handlers


Deployment

He won the roll and went first. My first thought during set up was realizing that I was outclassed in terms of damage potential in that he was packing two incredibly durable heavies with a specialized beast for holding center ground and manipulating the field.I also quickly realized that none of my anti-shooting defenses would work. The Cloud could only really block LOS, but otherwise the Krea's animus would have no value this game. I realized to win I'd have to get the most work out of my heavies, tying up key pieces, and trying to out position him.


That didn't happen. At all.


First Turn:

Simple first turn. He ran. I ran. He tossed Defender's Ward onto Tiberion, and ran everything forward.
I tossed Admonition onto the Gladiator, tossed 3 fury into the Agonizer, and walked Morghoul up 7", ran the Gladiator up 8", walked the krea and riled it for 1, and did the stupid thing of running both of my Cyclopes to opposite ends of the field pretty much to try and draw multiple angles. This left my Gladiator exposed which made the second turn almost as painful as being assassinated this early on would be...


Second Turn:
He ran everything up again. Upkept the same spells. The joy of SPD 4, it makes two turns feel like a really long single turn!

 Knowing I'm not in range to Alpha Strike him, and any steps forward I make would leave me in charge range, I just inch forward equal to my Speed. What I should have done in hind sight was Abuse and Rush him, drop Admonition and just wail on Tiberion as much as I could. However I didn't, and had him walk 4" and upkept Admonition. Morghoul ducked to the lower side near the cloud, out of Caster Cowardice.


Third  Turn:
Countercharge... I'm playing Skorne, as a Skorne Player, and I forgot about Counter Charge. He puts up Inhospitable Ground and killed my ONLY source of Pathfinder. This is going to be a long, slow game...
I spent my turn, run Morghoul up to the left (just like my game against Circle), abandoning one of my Savages who is enraged, and makes the one charge attack. My Agonizer uses the -2 Warbeast Damage Scream, and the Gobbers stay where they are and pop cloud, as they have no use due to Trample attacks being a thing. The Krea moved and tried to shoot Tiberion and hit so he can't run or charge.
We had a rules discrepancy on how Enrage mixes with Paralysis, so if anyone could answer that in the comments it'd be helpful. Morghoul pops feat and puts Admonition on himself.


Fourth Turn:
The Cyclops Died. No surprise. Inhospitable Ground was cast again by Xerxis, and he bunched up in the back corner.

The Beast Handlers whipped the Bronzeback to try to over pump my opponent's Fury Management. The Cyclops was Abused and tossed at Tiberion to try and get some damage in on it, but he was out of Morghoul's control area and couldn't be forced for more attacks. the Agonizer walked over and used the -2 Damage scream which did nothing this game. the Gobbers walk over slightly and pop cloud again.


Turn 5 + 6:

The Bronzeback killed a lot of Beast Handlers. Tiberion kills the Krea and a Gobber. Xerxis kills the Cyclops. Inhospitable Ground I believe was dropped.

Morghoul cuts for 4, and upkeeps Admonition and charges, making mince meat of some of his Handlers, and I clock in a hit or two for a total of 4 damage on Xerxis before I Sprint up the field.

I fell for the following trick before, and it got me again.
He moves his Mortitheurge up in front of Morghoul, I didn't Admonition away. Tiberion slams it into me. Knocks down Morghoul, Xerxis feats, and One hit kills me on 4 dice at P+S 20.


Graveyard Photos and Thoughts:


The way I lost was particularly painful. It was incredibly frustrating to lose at the Attrition game so poorly. It felt like I forgot everything that I learned. I would have just replayed this game from the beginning rather than fix any particular Tactical missteps.The Cyclopes should have been screening my Gladiator by running at a slight angle. Then I should have Abused/Rushed them and charged up to hold off Tiberion and the Bronzeback for a turn.

The big debate I'd have is whether to have them try to focus down and double team a particular heavy or to each hold off one.
I'd be screening Morghoul with the Krea. Then the target not engaged by the conceivably Enraged and Abused Gladiator next turn would be shot by an Aiming Krea to keep it from moving too far. Most importantly out of all this MORGHOUL WOULD SIT IN THE MIDDLE. He'd be screened, but still.
He has a very small control area, so he needs to be well screened, and able to consistently be involved in what's going on to well, he is squishy but he is not Issyria or the Harbinger.
He has no control area and wants to be up next to his beasts. He cannot hide despite his frame as an Assassin caster.
Don't let his squishiness keep you from giving him the placement so he can use his Control area.

 Most of my support pieces didn't really help. The Gobbers were USELESS. I did some research and realized that as 1pt. filler I'd be better suited by a Feralgeist to get more mileage out of my beasts.

Further, I've realized that I am running just too many light beasts for higher points values and need to pick up some of the Skorne staple heavies for the purpose of having the necessary pushing power.

I suffered from ridiculously poor positioning, and being out board controlled by my opponent. It was a bad, bad game from the first second and shows that I still have a lot to learn, in the departments of list building, and more importantly tactics.

If I could have redone this game, I'd have had the Cyclopes run at less of an angle, shield Morghoul with the Krea, and set Admonition on one of the Cyclopes instead, used that as a way to bait around the Bronzeback, or as a way to keep the Gladiator safer. Then, I would have had both of the Cyclopes charge at both of them, and then having the Gladiator smash the Bronzeback before it can smash back.
Then, I'll have the Krea and the Gladiator be able to focus on Tiberion. Morghoul would have been better positioned by being closer to the middle to take advantage of the feat far better than it had been used.
Even then, beyond getting a unit of Infantry soon, I plan on investing in a Bronzeback so I can run a bigger heavy punch than I've been able to with support oriented lights and a single heavy.

This match was an eye opener on the capacities that Skorne has for someone who owns few of the models at this point, but also was a good way to show what I lacked when faced with such massive armor skew.
For any new players, or new Skorne players, realize that if you don't have at least one game that makes you reevaluate what you have, and any problems you have in the game, then you won't be able to get better.


Sunday, June 22, 2014

Soviet Replacement Battle #28791

Given that I missed game night last week due to work, I’ve decided to post up my Khador Report, some of the details may be missing due to the age of the story, but this one is a lesson on positioning, and how quickly the game can change so quickly based on one bad move. I still didn’t pop feat, which I have decided to change very VERY soon.
This is also the Largest points game I’ve played, setting everything I own down onto the table, and with a 4th of my army being support pieces I was very nervous, but this managed to work out beautifully. Mostly due to the forest that was on my edge of the table. If that forest was not there, this match would have gone TERRIBLY. This also, was a match where Bricking up managed to work very well for me, and while I had issues moving it around, it managed to work out. Also, I got to really let Morghoul stretch his claws and sever a beautiful amount of arteries, which made me glad, because it allowed me to learn how to answer a very big question of board control with a surprising ease.

20pts. of Khador vs. Skorne
Khador:
pScorscha
Spriggan
Widow Makers
Widow Maker Solo
Ironfan Pikemen + UA + Kovnik

20pts of Skorne
pMorghoul
    Titan Gladiator
    2 Cyclops Savages
    Basilisk Krea
     Min. Pain Giver Beast Handlers
     Swap Gobbers
     Agonizer

The Khador player won the roll to go first. I took the picture a little late so that individual Ironfang on the far right should not be where it is. I did my best to brick up and put the important Support Pieces where they should. I had the Gobbers take front position, learning from the game where they accomplished nothing. The Paingivers stayed in the back but in range of each of the Beasts, and let the savages team up on the left flank to deal with the Widowmakers as need be. The Gladiator took point and I planned on having him ram head on into the Spriggan. This first turn I really planned on just trying to avoid/tarpit the Pikemen, as I knew that if they accomplished much or tied me I’d be spending my turns making out fury to tear through High Armor Infantry.


Turn 1:

Everyone runs. I got the picture here a little late so he was already starting his turn 2.
He just lets everyone run up, and maintains the same position on everything. Tosses down Fog of War with Scorscha.
I shift the brick to more of an ellipse, and do my best to keep everything safe from his Widowmakers and the Spriggan’s Lance Gun. I put Admonition on the Gladiator who is hiding in the Forest, to gain the benefits of Cover due to terrain. 
The Savages take flank on the left and right due to not having space in the beginning of the forest. The Krea pops animus keeping my Agonizer, and Savages and Gladiator safe. I use the Krea to screen my Caster, who is toeing the Gobber cloud, with the Beast Handlers hanging in the back as mild expendables. I forgot to put Fury into the Agonizer, to my Chagrin, but I had to use a lot of Fury this turn due to castings of Abuse to make my Gladiator hoof it fast enough.I twisted it around to keep my support pieces safer and less spread out so that the Widowmakers are as purely useless as possible. My opponent’s poor rolls this game honestly don’t help.


Turn 2:
The Khador player Upkeeps Fog of War and starts trying to take some shots at my stuff. He misses a lot with his Widow Makers, but manages to take down one of my Beast Handlers. The Spriggan fires at my Gladiator but doesn’t do anything particularly spectacular due to the buff stacking given by the Krea and the Forest, and shitty rolls. The Pikemen advance further.
My turn: Admonition is put onto Morghoul, and he puts Abuse onto the Gladiator. The Gladiator puts Rush on himself and slams the Spriggan, unfortunately moving outside of Morghoul’s tiny control area. I also send out one of the Cyclopes to deal with the Widowmakers and engage 2 of them, preventing them from firing on anything in particular. One Widow Maker dies, and two of them are engaged. 

Everyone else scoots over to the right, hiding in the forest, and benefitting from the Krea’s fantastic animus. I’m mostly scared of the Iron Fang Pikemen at this point because I hadn’t really figured out what to do with them this turn, other than a vague and fatalistic notion of tossing Morghoul at them since Pikemen are 1 Box infantry, and he can ricochet off them and deal with this tarpit with his bare claws. The Gladiator Slams the Spriggan just a little too far out of Morghoul’s Control Area after he put Rush on himself. I’m too prone to using Slam attacks rather than charges due to wanting to save Focus, but due to Morghoul’s small control area it’s not the wisest idea. I just need to soak that One Focus so that my Threat Ranges don’t extend past my caster. I forgot to pop smoke with my Gobbers. The Agonizer has been outpaced, becoming nothing more than 8 boxes of nothing due to no Arc Nodes being anywhere. The Agonizer is pretty useless against Khador. It doesn’t start getting useful anytime soon.


Turn 3:

The Ironfang pikemen charge in. This Triggers Admonition. I have Morghoul run backward, which was completely unnecessary and didn’t help Morghoul at all, as it caused issues for him trying to establish a ricochet charge. Fortunately, one of my Gobbers dies so it isn’t really a problem. Scorscha Dashes off to the side behind the wall. The Widowmakers try to toss out some shots, but are completely ineffective. 
My turn: The Gladiator fails it’s Frenzy check. It wiffs miserably on hitting the Spriggan. The Savage, to be useful, charges up and kills the Spriggan. The Paingivers Enrage the Krea and the Savage. Morghoul charges in and bounces around, dealing 1 point of damage to each of the Pikemen, accidentally dealing 1 damage to a multibox Kovnik rather than to the more useful targets. He clears the unit of single point infantry. He then sprints through the forest popping out on the other side. This one move cost me the game. The remaining Savage and Krea play clean up on the one or two models in the Pikemen unit, expertly removing them all in a single turn. This was my proudest and Stupidest moment in the entire game.
 I had it. I had cleared out the tarpit unit. I had let Morghoul show off the sheer levels of badass that Warlocks can attain, and had just been able to feel a rush of balls to the walls power tearing down an ENTIRE UNIT in ONE TURN. IN MELEE. It felt really good. But I messed up on running Morghoul to his limits and ran him too far through that forest. Leaving him totally exposed.


Turn 4:
Scorscha Casts Cyclone, then Advances, and fills my exposed Morghoul with Spammed Razor Wind. Killing him.


Kill Shot: 
Discounting casters I've decided to include a new point in my reports called "Kill Counts", where to clarify what happens in the rounds I post pictures of removed models at the end of the match for both sides. 

Thoughts:
Wow. That was a really rapid end. It was a series of badass one turn executions. Whether they be Ironfangs or ‘Locks. I got what I wanted out of this round on a visceral, simplistic level by managing to run Morghoul hot and buy a ridiculous amount of attacks. On a play level, I feel as if I had managed to play my brick pretty well, but if I didn’t have that forest than I would be by far worse off. Not to mention I have to give a very honorable mention to my local Khador player getting Terrible Rolls this game. Everything he fired missed horribly. It kept half his army from being really useful, which made my time A LOT easier.
I need to learn the importance of the Control Area, as I slam instinctively, due to it being the Gladiator’s shtick, always leaving him in a place where I can’t give him any maintenance. I haven’t had much experience with the Beast Handlers, so I need to plan ahead more on if the charge is at all as helpful at times as it otherwise would be. It’s about balancing out for that strange mixture of risk and preparing for failed die rolls. 

However, I got pompous with Morghoul about how far he could move, and just lost all sense in the power rush. I should have stayed in the forest.
I also lost my Gladiator BY AN INCH, pretty much consigning him to uselessness due to sitting on 4 Fury that he would never be getting rid of due to terrible positioning.

This battle really showed how important my positioning is round by round, and that a good brick for some casters works better than others.